エディタ拡張でちゃんと Retina 対応する方法
こちらのプルリクによると EditorGUIUtility.pixelsPerPoint を使うのが良いみたいです。
Unity-Technologies / cinematic-image-effects / Pull request #17: [tcg] Retina support for Unity 5.4+ (color wheels). — Bitbucket
https://bitbucket.org/Unity-Technologies/cinematic-image-effects/pull-requests/17/tcg-retina-support-for-unity-54-color/diff
返す値が 2 なら Retina。
Unity - Scripting API: EditorGUIUtility.pixelsPerPoint
https://docs.unity3d.com/ScriptReference/EditorGUIUtility-pixelsPerPoint.html
マウスの情報についてはこちら。
Unity - Scripting API: HandleUtility.WorldToGUIPoint
https://docs.unity3d.com/ScriptReference/HandleUtility.WorldToGUIPoint.html
Unity - Scripting API: HandleUtility.GUIPointToWorldRay
https://docs.unity3d.com/ScriptReference/HandleUtility.GUIPointToWorldRay.html
使用例1 - CustomEditor の OnSceneGUI()
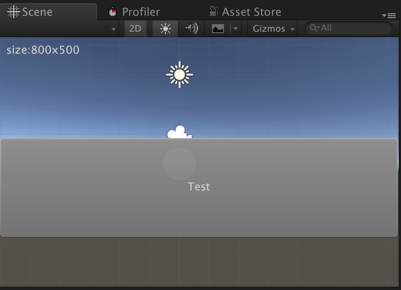
CustomEditor の OnSceneGUI() で EditorGUIUtility.pixelsPerPoint を考慮しないで描画処理を記述すると Retina 対応のディスプレイではこの様な描画結果になります。

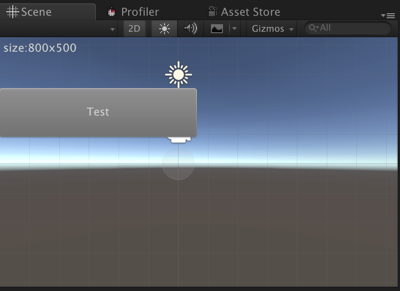
Scene View のサイズが 800x500 の時に 400x100 のボタンを描画したにも関わらず、横幅一杯のサイズのボタンが描画されています。
ちゃんと EditorGUIUtility.pixelsPerPoint を考慮したプログラムは以下の様になります。
using System.Collections;
using System.Collections.Generic;
using UnityEngine;
using UnityEditor;

[CustomEditor(typeof(OnSceneGUISample))]
public class OnSceneGUISampleEditor : Editor {
    Rect ScaledRect(Rect rect)
    {
        var s = EditorGUIUtility.pixelsPerPoint;
        rect.x /= s;
        rect.y /= s;
        rect.width /= s;
        rect.height /= s;
        return rect;
    }

    void OnSceneGUI()
    {
        var sceneCamera = SceneView.currentDrawingSceneView.camera;
        var cameraRect = sceneCamera.pixelRect;

        Handles.BeginGUI();
        Rect labelRect = ScaledRect(new Rect(5, 5, cameraRect.width-10, 40));
        GUI.Label(labelRect, string.Format("size:{0}x{1}", cameraRect.width, cameraRect.height));
        var buttonRect = ScaledRect(new Rect(0, 100, 400, 100));
        if (GUI.Button(buttonRect, "Test"))
        {
            Debug.Log("Push!");
        }
        Handles.EndGUI();
    }
}
使用例2 - クリックした位置に赤い Sphere の Gizmo を表示
using UnityEngine;
#if UNITY_EDITOR
using UnityEditor;
#endif

public class Test : MonoBehaviour {
#if UNITY_EDITOR
    bool debugClick = false;
    Vector2 debugClickPos;
#endif
    void Start()
    {
        // ここでは正しい値を返さない
        // Debug.Log(EditorGUIUtility.pixelsPerPoint);
    }
    void Update()
    {
        // ここでは正しい値を返さない
        // Debug.Log(EditorGUIUtility.pixelsPerPoint);
    }
#if UNITY_EDITOR
    void OnDrawGizmos()
    {
        // ここでは正しい値を返す
        // Debug.Log(EditorGUIUtility.pixelsPerPoint);

        if (Event.current.type == EventType.MouseUp)
        {
            var mousePosition = Event.current.mousePosition;
            var ray = HandleUtility.GUIPointToWorldRay(mousePosition);
            debugClickPos = ray.origin;
            debugClick = true;
        }

        if (debugClick) {
            Gizmos.color = Color.red;
            Gizmos.DrawWireSphere(debugClickPos, 0.5f);
        }
    }
#endif
}
関連情報
Scene ビューで Gizmo を使う - 強火で進め
http://d.hatena.ne.jp/nakamura001/20120929/1348925143
